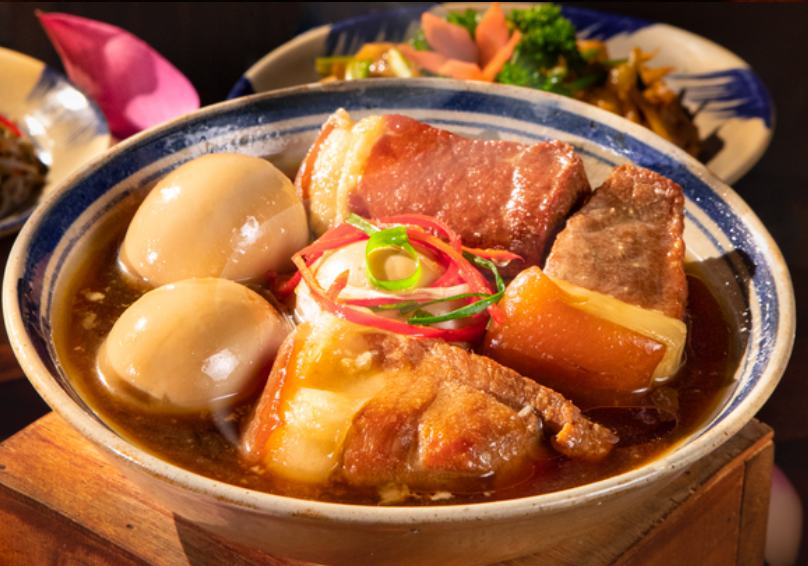
Braised pork with eggs, also known as “Thịt kho tàu,” is a beloved dish frequently found on the dining tables of many Vietnamese families, especially during the traditional Tet holiday. This dish pairs exceptionally well with rice, thanks to its rich and savory flavor, where the tender pork belly melds seamlessly with the aromatic eggs, creating an irresistible appeal. In this article, you will find a detailed guide on how to prepare this delightful dish, making it a perfect addition to any Vietnamese family meal.

1. Ingredients for Vietnamese-Style Braised Pork with Eggs:
- Pork: 500g
- Duck/Chicken eggs: 5
- Fresh coconut water: 400ml
- Green onions: 1 stalk
- Shallots: 1 bulb
- Garlic: 2 cloves
- Chili: 1
- Cooking oil
- Seasonings: fish sauce, pepper, seasoning powder, MSG, sugar, salt

2. Delicious Braised Pork with Eggs Recipe
Step 1: Prepare the Ingredients
Begin by prepping the pork. Soak the pork in a diluted saltwater solution, then rinse thoroughly with cold water and let it drain. Next, cut the pork into bite-sized cubes, ensuring each piece includes a balance of skin, fat, and meat for the best texture and flavor.

Next, place the eggs in a pot of water and boil over medium heat for about 15 minutes. Once cooked, transfer the eggs to cold water to cool, then peel off the shells.
Peel and wash the shallots and garlic, then finely chop them.
Thoroughly clean and finely chop the green onions.
Wash the chili, remove the seeds, and finely chop it.
Step 2: Perfect Marinating Recipe
Marinate 500g of pork with 3 tablespoons of seasoning powder, 2 tablespoons of fish sauce, 2 tablespoons of sugar, 2 tablespoons of cooking oil, and 1 tablespoon of pepper. Mix the pork thoroughly with these ingredients to ensure even coating. Allow the pork to marinate for 30 to 45 minutes to absorb the flavors fully.

Step 3: Making the Caramel Sauce
Place a pot on the stove over high heat to warm it up. Add 3 tablespoons of sugar to the pot and cook until the sugar turns a deep brown color. Then, add a small amount of water and bring the mixture to a boil, stirring continuously to prevent the caramel from burning and becoming bitter. Once the caramel sauce has thickened, turn off the heat.
Step 4: Braising the Pork with Fresh Coconut Water
Heat a bit of cooking oil in a pot, then sauté the chopped garlic and shallots until fragrant. Add the marinated pork, stirring until the meat is seared and turns a golden brown. Add the chopped chili and pour in the fresh coconut water, stirring well. Cook until the pork is nearly tender. Next, add the peeled eggs and enough water to cover the eggs and meat. Add a bit more fish sauce for flavor. Continue to braise the pork and eggs for another 30-45 minutes before turning off the heat.
Step 5: Enjoying the Braised Pork with Eggs
Serve the braised pork and eggs on a plate or in a bowl, accompanied by other dishes. If your family enjoys spicy food, you can sprinkle additional pepper, chili, and chopped green onions on top.
To fully appreciate this delicious braised pork with eggs, serve it hot. The dish boasts a beautiful brown color and an incredibly rich and savory flavor. The tender, succulent pork and the rich, flavorful eggs make for an exceptionally delightful meal!

3. Tips for Cooking Delicious Braised Pork with Eggs
To create an enticing braised pork with eggs, choose pork belly with high elasticity. When pressed, it should leave a temporary dent without any lasting mark, and the meat fibers should be uniform. Opt for a thick cut with an even distribution of lean meat and fat to ensure the pork becomes tender and stays moist during braising.

If you don’t have duck or chicken eggs, quail eggs can be a great substitute. Fresh eggs usually have a slightly rough, textured surface, whereas smooth, shiny eggs have likely been stored for a longer time.
While braising the pork, avoid covering the pot. This will help keep the braising liquid clear and visually appealing.
Braised pork with eggs can be stored in the refrigerator for about 2-3 days. When it’s time to eat, simply reheat the dish for a few minutes or use a microwave, and it will retain its delicious aroma and taste as if freshly cooked.
4. Perfect Side Dishes for Braised Pork with Eggs
Braised pork with eggs pairs exceptionally well with steamed white rice, pickled scallions, bean sprouts, pickled mustard greens, fresh herbs, or even watermelon. This beloved dish, with its unique blend of coconut water sweetness and distinctive cooking method, leaves a memorable flavor for anyone who tastes it.
Here are four side dishes that enhance the deliciousness of braised pork with eggs:
- Steamed White Rice: This classic combination makes for a perfect meal, providing a satisfying and nutritious option that prevents boredom from repetitive flavors.
- Pickled Vegetables: The tangy crunch of pickled vegetables enhances the dish’s flavor, providing a refreshing contrast to the rich and savory pork, making it more enjoyable and less greasy.
- Fresh Herbs: Adding fresh herbs to the dish not only makes it more appealing but also balances the richness of the pork, making the meal healthier and more vibrant.
- Boiled Vegetables: Serving braised pork with boiled vegetables adds fiber to the meal, reducing the heaviness of the pork and creating a balanced, healthy, and easy-to-digest dish.
Additionally, braised pork with eggs pairs wonderfully with traditional Tet foods like banh chung and banh tet, adding a delightful touch to holiday meals.
If you’re unsure what to cook, try your hand at making braised pork with eggs for your family to enjoy. We hope this Vietnamese-style braised pork with eggs recipe helps you achieve delicious results. Don’t forget to share this recipe with anyone who might need it!
